January , 2022

How to Spot Drowning
How to Spot Drowning
Taking a trip to the pool or the beach is a favorite summertime way to help beat the heat. But when having fun around the water, it is always important to take precautions. One of the main fears is someone will drown.
Fortunately, there are steps you can take to help prevent drowning, to be able to recognize the signs of drowning, and to know what to do if someone begins to drown. Making sure you're equipped with the appropriate skills and equipment is crucial while swimming. It could save someone's life.
The Signs of Drowning
In TV shows or movies, it is almost impossible to miss that someone is drowning. Well, most of that is an exaggeration. It can actually be difficult to recognize when someone is drowning. If you spend a lot of time in or around the water, especially if you have younger children, you need to be able to recognize the signs of a distressed swimmer.
It is first important to note the motions of a distressed swimmer. Unlike in the movies, someone drowning won't usually have the ability to yell for help. Their head will be mostly submerged. Also, their arms won't be flailing about in an alarming manner. Usually, someone drowning will be making relatively normal swimming motions to try to get themselves back to the surface. You really have to be paying attention to someone, because their motions won't be an attention grabber.
For an older child or adult, they will typically be in a vertical position. Their head will probably be slightly sticking up out of the water and tilted back a little bit. Most people in this age category will have their arms out to the side or in front of them trying to push themselves back to the surface.
Infants and toddlers' heads are much heavier compared to the rest of their bodies. They won't have the strength to use their arms to move themselves around, so most distressed children will be lying facedown on the water. However, they could also be completely submerged or just have their mouth and nose underwater. A younger child that is drowning will be more still than an adult because they won't have the ability to fight to get above the surface.
For children, it only takes about 20 seconds for them to fall completely underwater. For adolescents, it takes about 60 seconds. In both cases, you have a very minimal amount of time to notice and help someone in distress before they fall under.
While some believe that children are the main victims of drowning, there is a chance anyone could become distressed and drown, even a professional swimmer. If you are at the beach or the pool, the best way to be able to quickly notice someone drowning is to watch VERY closely to everyone's actions while swimming.
What Do I Do If Someone Is Drowning?
There are several steps you need to follow to be able to truly identify when someone is drowning and get them to help they need.
- Call out to them. Like we've previously mentioned, someone drowning probably won't have the ability to talk. If you call out to them and they don't or can't respond, this is a pretty good sign they're in trouble.
- Have someone nearby call 911. No matter the situation, you should call 911. Even if it looks like the person will save themselves or someone can grab them quickly, you'll want an ambulance to come check out the patient. And if anything seems abnormal or if a hospital is truly needed, first responders will already be there to help.
- Resist the urge to jump in. Everyone's inclination is going to be to jump in and try to save the drowning swimmer. However, this action can actually cause more problems than it solves. A drowning swimmer's first instinct is to grab onto or pull on the person trying to save them, which means the person trying to help could also end up drowning.
- Try reaching for the person while you're still on land. If you're at the pool, try lying down on the surface around the pool and reaching your hand out to help the swimmer. If they're too far out to reach that way, try using the steps or ladder to get you closer. Whatever you do, make sure you have a very tight grip on someone so the distressed swimmer doesn't pull you in and possibly cause issues for you.
- Flotation device. If you're still unable to reach the distressed swimmer, try throwing them a flotation device. This device could be a pool float, life jacket or even a sealed cooler. Anything that will float that the swimmer can grab onto can help them out.
- Swim the flotation device to a distressed swimmer if needed. If you're in a larger pool or at the beach where you can't simply throw the device at the swimmer, you can quickly swim it out to them to grab onto. Just be extremely cautious if you have to do this. Don't make direct contact with the swimmer. If you aren't careful, you could both end up in distress.
- If the person is unconscious, get a flotation device around them. If a distressed swimmer has already fallen unconscious, get a flotation device around them to lift them out of the water. However, if the person has fallen unconscious and fallen below the surface, it could be difficult for you to swim down and grab them. At this point, it is highly recommended that you wait for a professional.
- Once the person has been saved (if no first responders have arrived yet), someone who knows CPR should preform it now if needed. If it is determined that the swimmer needs CPR, now would be the time for someone who knows the proper technique to perform that until a first responder can get there.
Everyone wants to help however they can, so it is important that you know what you need to do to truly help someone who is drowning — without endangering yourself.
Get the Lifeguard Equipment You Need to Help Prevent Drowning
To prevent drowning, you need to be prepared. You need to know what to do if someone is drowning. You should have all the necessary supplies and equipment to help a distressed swimmer until a first responder can get there.
The Lifeguard Store can provide you with the necessary rescue and training equipment to make sure you're prepared for any accidents while swimming. If you have a team of lifeguards that you need matching apparel and equipment for, you can create a custom store on our website!
You can shop all of our apparel and equipment online, but if you need any help or have questions or concerns, you can contact us via our website or give us a call at (800) 846-7052. Let us supply you with everything you need to save a life!!
Learn More About Safety Tips:
What Is the Lifeguard Brick Test and How to Prepare
Becoming a lifeguard is an exciting and gratifying job for water lovers and avid swimmers. Working as a lifeguard gives you the chance to sit out in the sun and hang out by the water all day. It also allows you to help people by either acting as an instructor and teaching them how to swim or by saving them in an emergency.
Every lifeguard shows up to their shift hoping to avoid water emergencies, but because accidents are always a possibility, you have to be ready in case they do occur. As a lifeguard, you are responsible for doing everything you can to assist swimmers who may need your help, so making sure you are ready to perform these duties is essential in becoming a lifeguard.
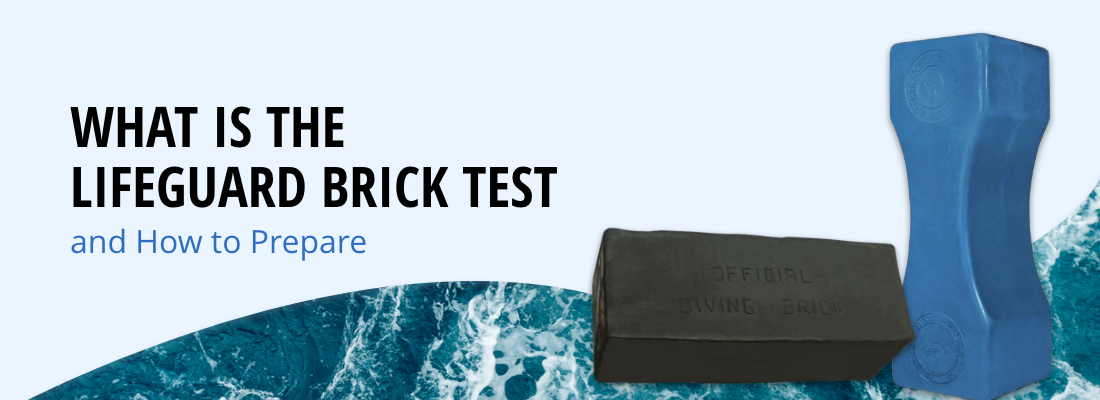
What Is the Lifeguard Brick Test?
The lifeguard brick test is required to become certified and ensure that you are ready to take on the lifeguard role. A dive brick or lifeguard training brick, often used for strength and rescue training, is a ten-pound steel mass covered with hard rubber designed for use in the pool without harming pool sides or bottoms.
Lifeguard training requires you to be able to retrieve and swim with this weight. More specifically, to successfully complete the lifeguard brick test, you must begin out of the water at one end of the pool. You must swim the entire length of the pool, pick up the brick from the bottom of the pool and swim back to your starting position. As you swim back with the brick, you must have two hands on the brick and keep the brick on the surface of the water.
In this scenario, the diving brick represents a drowning victim at the bottom of a pool, and this exercise proves that you can successfully save them.
How to Prepare for the Lifeguard Brick Test
With proper practice, training and the drive to pass your certification, you will be ready for this test in no time. The simplest way to prepare for the test is to break it down into sections and practice each part individually before attempting the test in its entirety. The test best breaks down into four steps:
1. Locate the Brick
Start preparing for the brick test by practicing the 20-yard swim without goggles. Although this may already be easy for you, do not skip practicing this step. Try out different techniques and strokes and see which one gets you closest to the brick the fastest and allows you to see the brick easily and clearly.
The more efficient you are in this beginning step, the more prepared you are to take on the rest of the test. Also, note that efficiency does not necessarily mean the quickest. Even though it is important to make the rescue in a timely manner, as it is a timed test, make sure you do not use all your strength for the swimming portion of the test because you will need more energy later when you retrieve the brick.
2. Retrieve the Brick
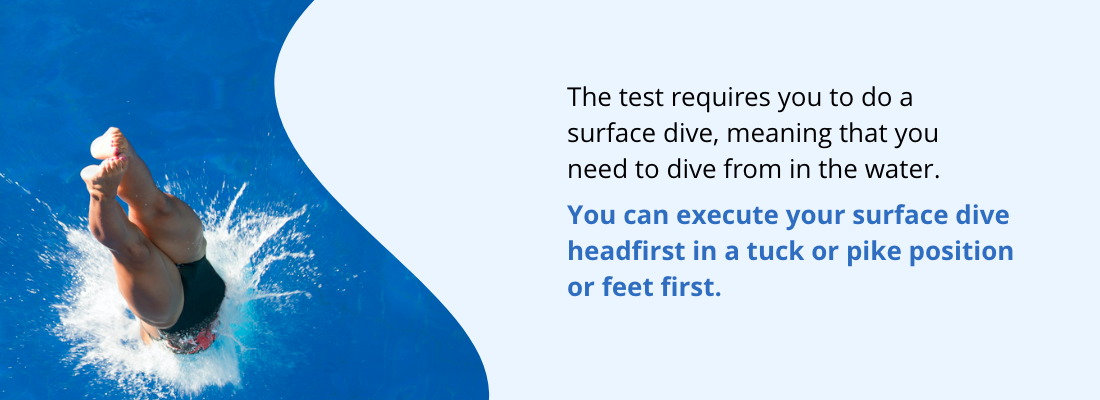
The second step to prepare for is diving and getting the brick. The test requires you to do a surface dive, meaning that you need to dive from in the water. You can execute your surface dive headfirst in a tuck or pike position or feet first. Try each of these techniques and figure out which works best for you. Practice where you need to position yourself to keep the brick in front of you, allowing you to reach it without having to do much searching after you initially locate it.
3. Swim the Brick Back to the Start
After you retrieve the brick, your next focus is how you plan to bring it back to your starting position. This step may be the most important part of the test because you need to remember to keep two hands on the brick and make sure you keep it above the water. Figure out the best kick for you to use that will get you to the edge of the pool quickly.
Another thing to consider is where to hold the brick. Some people find it easiest to rest it up the upper part of your chest, while others move it a little lower, still keeping it afloat.
4. Exit the Water Without Using the Ladder
Most of the time, the most convenient way to get out of the pool is by using the steps or ladder. The test, however, requires you to get out of the water without assistance. Some people find it easiest to get out backward, and others like to face the wall and push themselves up, bringing their feet onto the side of the pool. Decide which option is easiest for you and do that during the test.
Doing each of these steps individually is crucial because it will help give you the confidence you need to complete the test successfully. Once you know that you can do each step, practice them together and time yourself. Figure out what steps you need to complete the fastest and where you need to exert most of your energy. Experiment with different combinations of speed and energy exertion until you find the most effective one for you.
Tips for Surviving the Lifeguard Brick Test
Even after breaking the test down into various steps and practicing them individually, it still may be difficult for you to complete the lifeguard brick test in the allotted time. Here are a few tips on how to prepare for and complete the lifeguard brick test.
1. Take Your Time
Even though it is a timed test and in a real-life situation you would want to get to the victim as soon as possible, you need to make sure you save enough energy for when you will need it the most later in the test.
2. Keep the Brick in Front
When you flip over to dive to the bottom of the pool, you want the brick to be directly under you where you can reach it. The best way to ensure that you dive with the brick positioned there is by keeping it slightly in front of you so that you will land right on it after the dive.
3. Get to the Surface Quickly
Whether you decide to surface dive headfirst to reach the bottom of the pool or go feet first, then squat to grab the brick, both techniques allow you to put your feet to the ground and push up toward the surface of the water. Propel yourself up by doing this, then flutter kick until you break through the water’s surface.
4. Swim on Your Back
Many people find the test more difficult when swimming on their stomach or side while keeping the brick above water. Floating on your back, holding the brick to your chest and kicking, is a good strategy because it uses your body’s natural buoyancy to make swimming the brick back easier. Many swimmers recommend doing the kick used in the breaststroke, also known as the frog kick, because it's more powerful.
5. Avoid Submerging the Brick
As long as you get the brick back to the side of the pool without completely submerging it, you can keep it on the surface of the water. Keep this in mind because removing the brick entirely from the water takes a lot more energy and is much more difficult.
6. Use Both Hands for Stability
When you reach the side of the pool, stable yourself with one hand and use your dominant or stronger hand to place the brick on the side. Once you finish this, all you have to do is get out of the pool and complete the test.

Get the Lifeguard Training Equipment You Need From The Lifeguard Store
If you are ready to jump into action and help enforce water safety, get all the lifeguard training equipment you will need from The Lifeguard Store today. Find everything you need to prepare for the brick test, your certification and your first day on the job as a lifeguard.
At The Lifeguard Store, we take pride in having an abundant selection of new styles and colors at the best price. With low flat rates and free and speedy shipping, we want to ensure our customer's satisfaction. So, if you are looking for anything from swimwear to apparel, rescue equipment to guard accessories, check out the Lifeguard Shop for great products at a great value. Try our women's RISE Solid Poly Tri Color H-Back or our men's RISE Guard Splice Flex Board Shorts today!
Learn More About Lifeguard Skills and Training: